![]()
Accra Backup client is used to backup files from your device (PC/Server/Mac/Linux/Unix/AIX) to the Accra Secure Backup server using the secure HTTPS protocol. The version of Accra Backup client is tied to Accra Backup server version. We recommend you use the same version and build number than the Accra Backup server. You can update your backup software using the Backup Client update program installed on your device.

Downloading Accra Backup Client
Follow the steps below to download Accra Backup Client.
Connect to the Accra Backup Server using a web browser on the client machine. the web site is https://secure.accra.ca:8085
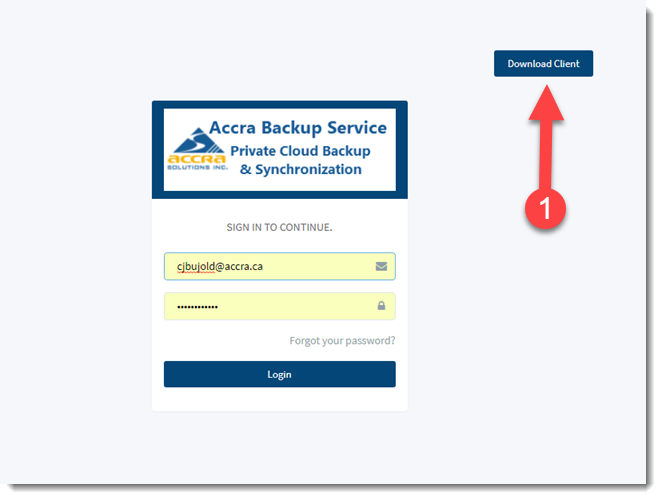
Click Download client (1) and select the download that matches the system you wish to backup.
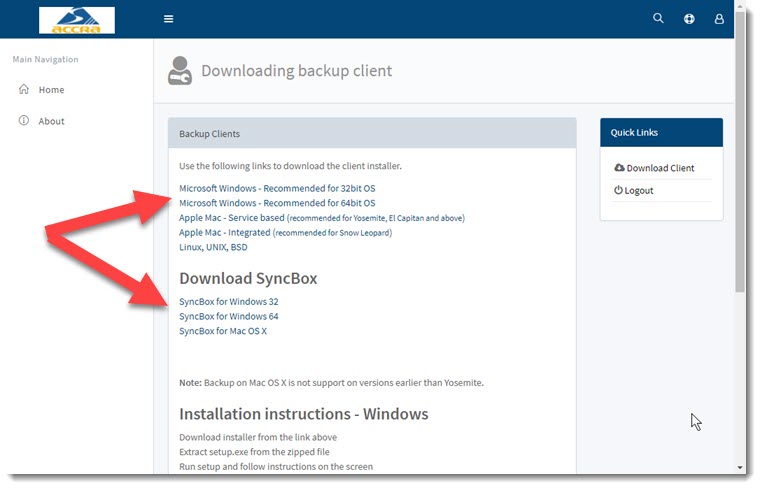
Note: Backup on Mac OS X is not support on versions earlier than Yosemite.
Installation instructions - Windows
•Download installer from the link above
•Extract setup.exe from the zipped file
•Run setup and follow instructions on the screen
•Click the icon to run application
Installation instructions - Apple Mac
•Download application bundle from the link above
•Extract the contents of the zipped file and copy it to a folder of your choice
Installation instructions - Linux, UNIX and BSD
•Download application from the link above
•Extract the contents to a folder of your choice
•Start backup client using the following command
•java -jar SyncrifyClient.jar
•IMPORTANT: You will need Java runtime, which can be downloaded from http://java.net
Concept of profiles
A profile defines a set of files/folders that are grouped together for backup. When Accra Backup client is first used on any client, it automatically creates a profile and gives it a name that matches the machine's host name.
Typically, you would only need one profile per machine for a user. However, if you wish to backup certain files at a different schedule, you might want to create additional profiles.
To add files/folders to a profile, drag the desired folder from Explorer to left hand panel. You could also click the right mouse button an select Add a file or folder from the pop-up menu. There is no limit on the number of files you add to a profile.
By default every file in a folder is selected for backup. To exclude, navigate to the desired file and un-check its name.
Specifying backup parameters
Following parameters must be specified before a backup is performed.
Specify files to backup. This is done by either dragging a file from Windows Explorer to the left hand side of the screen or by clicking the right mouse button and selecting Add a folder/file menu item.
Current Profile Name - this automatically populated and contains the name of the profile currently selected
Remote Server URL - this should contain the URL for the Accra Backup server.
Login Email - This is the email address used for registering the user on Accra Backup server.
Login Password - This is the password for the user.
Remote Server Path - This is a system assigned value that is used on the server's end to store files. Most likely you will not have to modify this value and leave it the way it is.
Advanced Options - To access the Advanced options, click the Advanced tab. Refer to the image below.
Delete files from server - when checked, Accra backup Client will delete file from the server if the corresponding file is deleted on the client. When this is not checked, a copy will remain on the server.
Send notification email - Check this box if you want Accra Backup client to generate an email when a backup is completed. The box next to the check box is used to specify the recipient(s) of the email report. When this box is left blank, the login ID is used as the recipient address. Use a comma to separate multiple addresses.
This email is only sent when a scheduled backup is run. Email is not generated when a user manually runs a backup.
Compress data - when checked, smart compression is used before sending the data over the network. During the backup if no significant size reduction is gained by compressing a file, data gets sent as-is. Consider a scenario where you have large files containing a relational database, which can be significantly reduced in size by using compression. On the other hand, files like MP3, JPG do not reduce in size when compression is applied. In such cases, the compression step is eliminated saving CPU cycles on both client and server.
Enable versioning - when checked, multiple versions of every file are stored on the server. The number of older versions maintained on the server is defined by the service package you have purchased. A version is only created if a user modifies a file.
Encryption - Use this tab to enable encryption and specify a password. Refer to this document before using encryption during backup.
Running backup manually
To run a backup on demand, simply click the Backup button

Running backups from command line
Before you can run backups from command line, you have to create a Profile using the GUI. Every profile you create is stored in user's home directory with a file extension of .syncrify
On Windows you can run a backup by specifying the Profile file name as a command line argument to Backup Client.exe file. For example:
C:\Program Files\syncrify\syncrify.exe MyProfile.syncrify
In the above example, MyProfile is the profile name of the profile you want to backup.
On Linux and other platforms, you should be able to execute a backup by using the following command line:
syncrify.sh MyProfile.syncrify
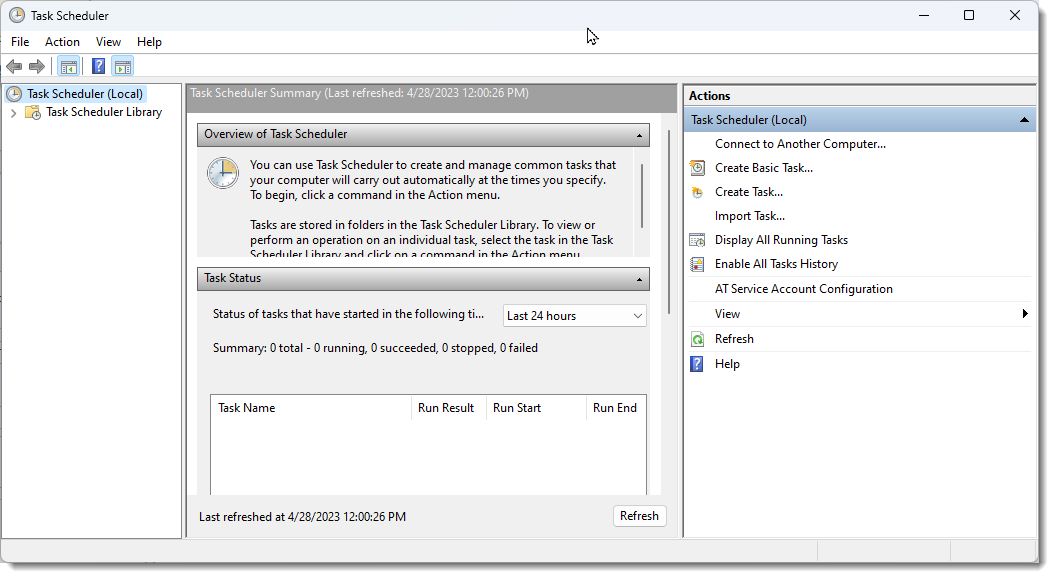
Scheduling a backup on MS Windows
On Windows, the scheduler for the backup Client is integrated with the operating system. Every Windows machine comes with a task scheduler that is used to schedule backup tasks on the client machine.
Review Windows Task Scheduler help to schedule a backup.
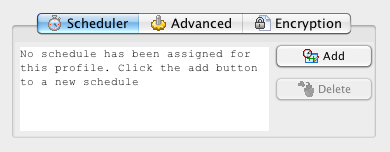
Scheduling a backup on Mac OS X
Scheduling a backup task on Mac is similar to Windows but it uses the built-in scheduler that comes OS X.
Following steps demonstrate how to schedule a backup on Mac.
Click the Add button at create a new schedule.
This opens up the scheduler windows, which looks like the image below
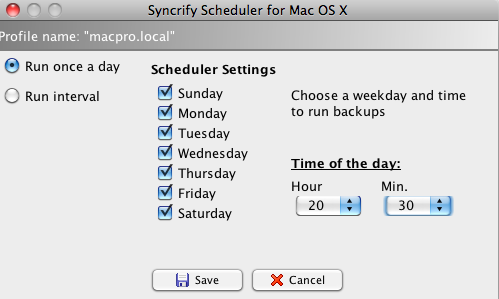
This window allow users to select the weekday and a time of the day to run the backup task. Notice that hour are represented in 24 hour time format - meaning if you want to schedule a task at 8:30 PM, you will have to select 20 for hour and 30 for minutes.
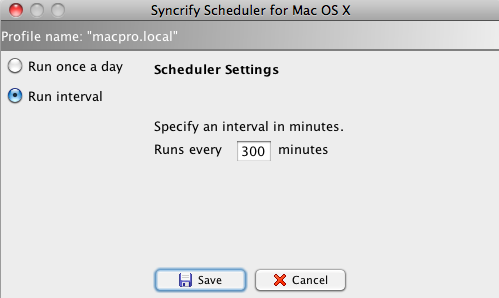
You should also specify a time interval to run backup. This allows you to run the backup task after every X number of minutes. For example, to run a backup every 5 hours, specify 300 minutes. See below.
Restoring files File restoration is accomplished either by a web browser or using the Accra Backupclient.
Using web browser
Using a web browser connect to Accra BackupServer. The URL in the address bar must be exactly what you typed in the Remote Server URL when specifying backup parameters. Use your email and password to login. Once logged in, you will be displayed a remote file explorer containing files that are backed up on the server. Simply navigate to the file you want to restore and double click it to download.
Restoring encrypted files
When encryption is used, files residing on the server cannot be viewed or opened by anyone. Therefore, when you use a web-browser to download any file, they need to be decrypted manually once they have been downloaded. If you try to open the downloaded file without decrypting it first, you will get errors in the program that is trying to open it.
Use the following steps to decrypt files:
Download encrypted file(s) using your browser
Start Accra Backupclient on the machine
Click Encrypt/Decrypt files from the Tools menu
Select Decrypt for Conversion type
Specify the password you used for encryption
Select the desired file
Finally, click Start Processing